HOW TO USE CUE 1
Cue 1 has been designed to be simple and easy to use. The information below will assist you in getting familiar with your CUE 1 experience.
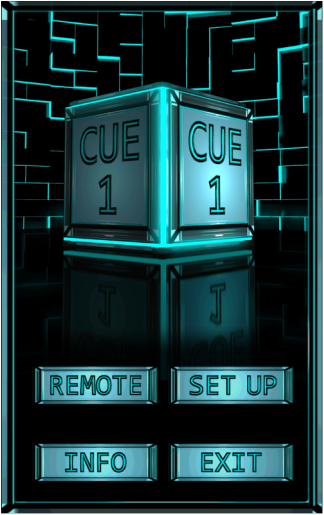
MAIN MENU
The Main Menu screen is the opening screen for CUE 1. This is the central area for accessing the various aspects of the application.
|
REMOTE
Access to the main functionality of CUE 1. SET UP Access to the Settings menu. INFO Access How To Use instructions. (this webpage) EXIT Closes the CUE 1 app. |
SETTINGS
The Settings screen is the place to set up CUE 1 for communication with your lighting software.

CONSOLE IP ADDRESS
The IP Address of the device that is running your ETC Eos®/ Ion® software. This address can be located in numerous places. Two common places to look are under the [About] tab or the [Diagnosis] tab in your lighting software. The IP Address can also be found in the Eos®/ Ion® Shell under network settings.
STRING RX PORT #
The port # that CUE 1 will use for sending UDP string commands. This port # is set under the show settings of the Eos®/ Ion® software (see Set Up). The RX Port # can be set to any available port # that you wish. However, the RX Port # that you specify in your lighting software MUST match the RX Port # that you set in your CUE 1 application. CUE 1 defaults to port # 55555. It is recommended to begin with this default value.
USER #
The user # specifies the user ID that you wish CUE 1 to represent. For example, by matching the user # in CUE 1 with the User ID of your lighting software(this can be found under Desk Settings/Displays in your lighting software), you will be able to see your actions register on the Eos®/ Ion® command line as if you had typed them in on the console yourself. If the CUE 1 user # does not match the User ID of your lighting application, then your actions will not register on the command line. However, your CUE 1 actions will still execute. It is recommended to experiment with this value to discover what works best for your situation.
The user # is an important value not to overlook. The setting of this value can greatly affect your CUE 1 experience. For example, if your lighting software is currently in BLIND mode and your user #'s match (meaning CUE 1 and your lighting software have the same user # values) then the commands that you send to your lighting software via CUE 1 will register as if you had entered them in BLIND mode. Essentially, this means that CUE 1 will act as if it is in BLIND mode. On the other hand, if CUE 1 and your lighting software do not have matching user # values, then you can execute commands via CUE 1 independently of the LIVE/ BLIND setting on your lighting software. Again, it is important to experiment with the user # value to find out what works best for your current situation. CUE 1 offers the ability to easily change this value without the need to close the app. You can simply switch back and forth to the SETTINGS screen and adjust the value accordingly.
The user # is an important value not to overlook. The setting of this value can greatly affect your CUE 1 experience. For example, if your lighting software is currently in BLIND mode and your user #'s match (meaning CUE 1 and your lighting software have the same user # values) then the commands that you send to your lighting software via CUE 1 will register as if you had entered them in BLIND mode. Essentially, this means that CUE 1 will act as if it is in BLIND mode. On the other hand, if CUE 1 and your lighting software do not have matching user # values, then you can execute commands via CUE 1 independently of the LIVE/ BLIND setting on your lighting software. Again, it is important to experiment with the user # value to find out what works best for your current situation. CUE 1 offers the ability to easily change this value without the need to close the app. You can simply switch back and forth to the SETTINGS screen and adjust the value accordingly.
SOUND
The sound option simply allows the user to toggle ON/ OFF the sound effects of CUE 1. This has absolutely no affect on your lighting software.
SAVE (BUTTON)
The save button provides the user with the option of saving the settings specified in this menu. If the user selects the [SAVE] button, these values will be saved so that the user does not need to re-enter them each time they start up CUE 1.
*Please note: The user is not required to save the settings values in order for them to work properly within CUE 1. Once the settings values are changed, they will immediately become active. These values will remain the current and active values until the user closes the CUE 1 app. If the user does not save the settings values, the previously used settings will be reloaded the next time the user starts up CUE 1.
MENU (BUTTON)
The menu button simply returns the user to the main menu screen of CUE 1.
REMOTE
The remote screen provides the user with access to the main functionality of CUE 1. There are two viewing modes available within the remote screen (STANDARD & EXPANDED). The user has the ability to toggle freely between the two modes by double-tapping the display area.
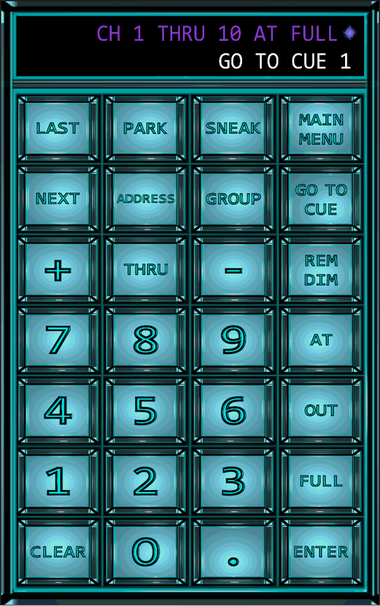
STANDARD |
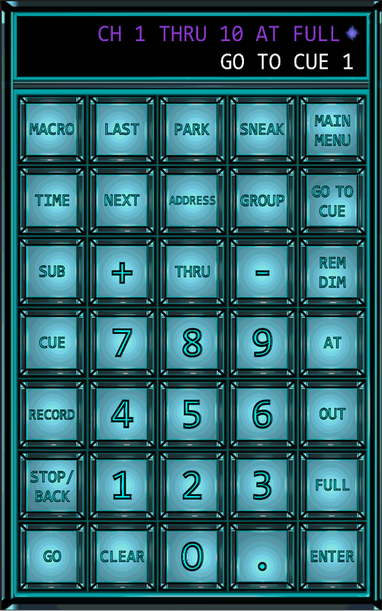
EXPANDED |
Regardless of which viewing mode you are in, there are two main areas of interaction.
- The button area
- The display area
The buttons are designed to mimic their respective commands within your lighting software. However, there are a few minor differences. Let's examine these exceptions.
MAIN MENU (BUTTON)
The Main Menu button simply returns the user to the main menu screen of the CUE 1 application. The functionality of this button is strictly for convenience within CUE 1. It has no affect on your lighting software.
ENTER (BUTTON)
The Enter button is used to send your command(s) to the lighting software. Minus a few exceptions(such as the [OUT] button), all commands will remain inactive until the [ENTER] button is selected.
CLEAR (BUTTON)
The Clear button has two functions.
- Selecting [CLEAR] will remove the previous selected command from the CUE 1 input display area.
- Holding [CLEAR] for 1.5 seconds will clear the entire CUE 1 input display area. This will also clear the command line of your lighting software.
SELF EXECUTING BUTTONS
The following buttons are self executing. This means that the user is not required to press [ENTER] after these buttons have been selected.
- OUT
- GO
- STOP/ BACK
- NEXT
- LAST
- AT + + (AT - -)
DISPLAY AREA
The display area consists of two simple lines of text.
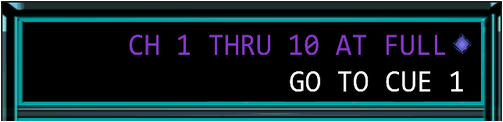
CURRENT INPUT (BOTTOM LINE)
The current input is the bottom line of text in the display area. This text represents the current CUE 1 user input. It is important to note that the text in this area will not be sent and executed by the lighting software until the user selects the [ENTER] button or another self executing button (see info above on self executing buttons).
PREVIOUS INPUT (TOP LINE)
The previous input is the top line of text in the display area. This text is representative of the previous command that the user has sent to the lighting software.
*IMPORTANT: Currently CUE 1 is a one-way communication application. CUE 1 only has the ability to send information. It does not receive information from your lighting software. Therefore, the previous input line of text is only representative of commands that CUE 1 has sent to your lighting software.
*IMPORTANT: Currently CUE 1 is a one-way communication application. CUE 1 only has the ability to send information. It does not receive information from your lighting software. Therefore, the previous input line of text is only representative of commands that CUE 1 has sent to your lighting software.
DISPLAY AREA INTERACTIONS
The user can interact with the display area in 2 ways:
- SLIDING TEXT: The user can select one of the lines of text and slide it to the left or right of the screen. This is useful for longer commands that exceed the viewing area in the display.
- DOUBLE TAP: The user can double tap the display area to toggle between the standard and extended viewing modes.
*Eos is a registered trademark of Electronic Theatre Controls, Inc.
*Ion is a registered trademark of Electronic Theatre Controls, Inc.
*CUE 1 and Mulvaney Studios have no association with Electronic Theatre Controls, Inc.
*Ion is a registered trademark of Electronic Theatre Controls, Inc.
*CUE 1 and Mulvaney Studios have no association with Electronic Theatre Controls, Inc.